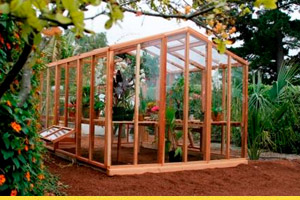
Building a Greenhouse

greenhouse-handysquadA greenhouse is a must in many gardens. Its controlled environment can not only enable you to grow exotic plants that wouldn’t survive outside, but will also either protect plants from frost or to bring on others early.

It needs to be carefully constructed to be effective, though. If you’re not confident about building a greenhouse in London, Handy Squad can put it up expertly, but if you decide to tackle it yourself, there are several things to remember.

What You Need

You can buy various sizes of ready-to-assemble greenhouses, with either timber or aluminium frames — the latter is easier to manage. It’s generally advisable, though not essential, to also buy a galvanised steel base.

Your glazing can be horticultural glass, toughened glass or polycarbonate panels. Horticultural glass shatters fairly easily and may be unwise if you have children. The glazing should have adjustable vents, so you can control ventilation.

Make sure you have room to get all the way round your greenhouse, and lay concrete or paved paths, both inside and outside, before you erect the structure.

Laying the Base

If you’re using a steel base, there are three ways of fixing it securely — small pockets of concrete with hooks embedded; bolting it to a concrete footing strip 200mm wide by 100mm deep; or fixing it to a course of bricks on the concrete footing. If you’re not using a base, you can attach the frame to whatever footing you use, but you may need wooden battens in between.

Using bricks is generally recommended. After checking the base kit to make sure everything’s there, assemble it according to the manufacturer’s instructions and lay it on the ground where you want the greenhouse. Mark it with two parallel builder’s lines, one 50mm from the outside, the other 150mm from the inside.

Dig out the trench and fill it with concrete, ensuring the top is perfectly level. When it’s completely dry, lay the base on it and draw a pencil line around its outer edge. Lay a single course of bricks around the centre of the concrete and give the mortar 24 hours to dry, then lift the base onto the bricks.

Building the Greenhouse

Lay out the pieces for each gable in turn on a flat surface, making sure everything’s the right way round, and bolt them loosely into place. Then follow the same procedure for each side and loosely bolt the four pieces together before screwing the frame loosely to the base.

Screw the roof ridge loosely between the two ends and attach the roof vent fittings before screwing in the roof glazing bars. Check with a spirit level that it’s completely level, then tighten all bolts and screws and drill 25mm frame fittings through the base into the brick course.

Assemble and screw the roof vent and slide it into place, then push the rubber line into the slots around the frame. Fit the glass from the roof down, securing each pane with clips. You’ll need to wear goggles and gloves for this, and work patiently, making sure each pane is right. Finally, assemble the door, including its glass, and slide it into place.

Think About a Professional

If you’re confident about building your greenhouse, well and good, but it may be better to get a professional in rather than ending up with a wonky and inefficient greenhouse. Handy Squad’s handymen can put up any type of greenhouse to the highest standard.

Tips on Dry-Lining a Wall

dry-lining-wallDry-lining, attaching plasterboard to a wall, is an easy way to prepare it for decoration. It looks straightforward, but it can be easy to mess up, and there are hazards, too. It’s usually best to get it done professionally and, if you’re interested in dry-lining in London, Handy Squad’s handymen take this kind of job in their stride.

If you feel skillful enough to do it yourself, though, make sure you wear gloves, safety goggles and a dust mask at all times, and especially when cutting metal.

Fitting the Plasterboard

For each board you’re going to fit, measure the width away from the window and use a laser level or spirit level to draw a vertical line from floor to ceiling. Do the same along the wall, then mark a line across the top, allowing 12.5mm for the board and 10-15mm for adhesive.

Plasterboard is normally attached to the wall with adhesive (which dries quickly, so only do small sections at a time), but alternatively you can fix a framework of timber studs to the wall and nail the plasterboard to it. This is useful if the wall’s in poor condition, but it also allows you to use the cavity for thermal insulation or to help with soundproofing.

Mark out positions for the adhesive dabs according to the manufacturer’s instructions, then mix the adhesive and apply the dabs with a builder’s float and pointing hawk. Align the plasterboard with the lines you drew and tap it into place with a heavy batten (e.g. a long piece of 50x100mm timber). Check that it’s level and that it fits against the ceiling. If it doesn’t, raise it off the floor with board lifter till the adhesive dries.

Cutting and Fitting

To make neat cuts in the plasterboard (for a windowsill, for instance) you need a plasterboard padsaw, rather than improvising. Measure on the wall the distance between where the edge of the board will be and end of the sill, then mark it out on the plasterboard and cut it out with padsaw.

To plasterboard a window recess, measure and cut the pieces for the sides and top. Once you’ve fixed them with adhesive, you’ll need to hold them in place while it dries. You can use masking tape for the sides, but for the top piece you’ll need to support it with timber between the board and the sill.

Finishing

To finish both internal and external angles, as well as the joins between the ceiling and the plasterboard, you can use a paper-faced metal angle bead fixed with jointing compound. When you’ve measured the height or length, cut the angle bead with tinsnips 12.5mm shorter than your measurement, then mix the jointing compound and spread it onto the corner, covering slightly more than the width of the angle bead. Press the angle bead into place, then cover it with jointing compound and smooth with a trowel.

The other joins can also be smoothed with jointing compound, sanding it smooth when it’s dry. In the end, though, the plasterboard will need to be plastered over, and this is best done by a professional. Whether you just need this last stage done, or whether you want to leave the whole process to experts, Handy Squad can provide an first-class service.

Replacing the Cord on a Sash Window

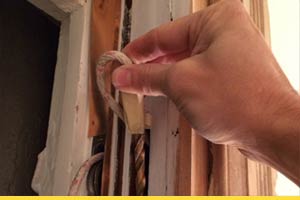
sash-windowsReplacing a broken cord on a sash window is a complex job that requires a good deal of skill and precision work. Most people would be best advised to have it done professionally, but it should be within the capacity of a skilled DIYer such as Handy Squad, though you should make sure you have an assistant.

Materials and Preparation

Sash cords can be a variety of diameters and materials (waxed or unwaxed hemp, synthetics etc.) and it’s important to match at the least the diameter of the new cord to the old one. Usually, you’ll buy a pack of sash cord that should have enough for your use. If you need to estimate what you need, buy two lengths for each sash that are 167% of the distance from top to sill.

Always remove the lower sash first, and use a mallet and chisel to remove the staff beads from each side. Once you have one loose, the remaining beads should pull out. Tie string round the cords near the pulley and cut the cords below it, running the string over the pulleys. The lower sash can then be removed.

Prise out the parting beads and pocket covers and remove the upper sash, then take out the weights and label them immediately. They may not be quite identical, so it’s important to put them back in the right place. The old cords can then be removed.

Replacing the Cords

Always replace the cords on the upper sash first, so it can be put back before you tackle the lower sash. With a 50mm screw or nail tied to a piece of string, feed it through the hole above the pulley so it drops into the weight compartment.

Attach one of your lengths of cord to the string and push it over the pulley and down, recovering it from the pocket and feeding it through the hole above the weights, having removed the string. Tie the cord in a figure-of-eight knot and push the end into the cavity above the weight, after which the weights and the pocket covers can be replace. Then repeat on the other side.

Replacing the Sashes

After replacing the upper sash, reposition the parting beads with a mallet, replacing any that are damaged. With the lower sash resting on the sill, raise the weights to their highest level and tie a knot in each cord level with the knot hole on each side of the sash.

Tap the staff beads back with a mallet and secure them with 25mm oval nails, but test that the sash works smoothly before hammering them all the way in. All that’s left then is to repair the windows with wood filler and repaint them.

Or, if all this sounds too much, you could always call us at The Handy Squad: 0800-0 12 12 12.

Defend Your Garden Against High Winds

Strong gales and storms are a fact of life over the British winter, and sometimes in summer. They can do plenty of harm to your garden, from ruining your plants to weakening trees, but putting some simple precautions in place can help minimise the damage.

Have a Robust Shed

One of many reasons to have a garden shed is to have somewhere to put tools and equipment during a storm. Don’t skimp on quality, since buying a good-quality shed can make all the difference.

Check that you have roofing felt to weatherproof your shed, and replace anything that’s split or worn. Also, ensure you can securely lock the door during a storm — this will help deter burglars, too.

Secure Your Fences

Your fences provide some protection from strong wind, but they’re also vulnerable to it. Paradoxically, your fence will actually be stronger if it has gaps the wind can blow through, reducing the pressure.

Treat wooden fences regularly with stain or preservative as protection against rot or insects. Don’t forget the posts, either. The buried part is especially vulnerable to rot and can bring the whole thing down if you don’t maintain it.

Trees Pose a Risk

If you have trees in your garden, a storm can snap branches off or even blow the tree down, causing damage or injury. To avoid this, keep your trees well trimmed, removing weak branches. It’s not a good idea, though, to top trees or remove substantial branches, as this can weaken it and leave it more vulnerable.

Instead, prune your trees, especially young ones. This reduces the bulk and, as with the fences, makes the tree safer by allowing more wind through. Trees should be the first things you inspect for damage after a storm.

Make Your Plants Safe

Wind can dry out, damage or even uproot plants. You can reduce the risk by putting up mesh or netting windbreaks, supporting plants with canes and wrapping containers in bubble-wrap. If you feel you need something sturdier, you can get a growhouse or coldframe.

Check that no stems or branches are crossing, which can cause damage, and ensure your plants are well watered before the storm. Any plants in pots should be placed against the side of the house.

Make Your Garden Secure

Before the storm arrives, any tools or equipment that can be brought inside should be put in either the house or the shed, and the shed door secured. Equipment and furniture that can’t be moved should be well weighted down.

You may still suffer some damage, but it can be considerably reduced by following these tips.

If in doubt please don’t hesitate to contact our trusted and reliable handymen on 0800-0 12 12 12.

Fitting a Letterbox or Catflap in Your Door

letter-boxFitting either a letterbox or a catflap — which are similar processes — should be quite possible for a skilled DIYer, although it’s obviously important to be careful cutting holes in your front door. Anyone unsure of their skill should consult and request the services of our skilled handymen at Handy Squad.

Fitting a Letterbox

When you know the letterbox’s size and design, establish the position to centre it by measuring the depth of the door’s cross rail in two places and marking the mid-point. Using these two points, draw a straight line right across the door, and then measure and mark the exact mid-point of the line.

Place your letterbox centred directly over this point and mark the positions on each side for the fixing bolts. Drill clearance holes, making them slightly larger than the bolt shank, then mark out a rectangle to cut out that’s slightly bigger than the flap.

Drill a hole at each corner big enough to take the blade of either a powered jigsaw or a padsaw and use the saw to cut around the marked rectangle. Cut recesses for the hinge-pin with a mallet and narrow chisel, and smooth the edges.

Fit the letterbox using the nuts provided and cut off any excess length on the bolts with a hacksaw. It’s a good idea to also fit an interior cover, since this will help keep out draughts.

Fitting a Catflap

If letterboxes vary in design, catflaps vary even more, with some of the more sophisticated programmed to open when the particular cat’s collar comes close. It’s essential to read the instructions and follow them to the letter.

The exact position for the catflap will depend on how your cat will use it. Once you’ve decided this, position the supplied template on the door and tape it on, making sure the tape will be easy to remove. When you’re certain the position is right, drill a hole of at least 8mm at each of the four positions shown, big enough to get the blade of your jigsaw or padsaw in.

Remove the template and draw ruled lines between the four points. Cut out the section along the lines you’ve made with a power jigsaw or a padsaw, and smooth the edges.

Hold the catflap up against the door in its place and, once you’re satisfied it’s level, drill clearance holes for the screws. Hold the two parts of the flap securely in place on either side of the door and fix each screw through the clearance holes, fastening the two parts together. Check that the flap can swing freely, and you’re finished.